Using your phone as a presentation clicker and pointer
A free and open-source solution for giving presentations effectively
When you are giving a presentation, say, at a conference, you want to be able to move around the stage. You do not want to be tethered to your laptop behind the podium, and you definitely don’t want to be yelling “NEXT” to a person at the keyboard each time you want to change the slide.
You could go and purchase one of the presenter pointer clickers available in the market. They usually come with a USB dongle that you insert in your laptop. They have forward and back buttons that let you change slides and a laser pointer that you can use to point at things on the slides.
While these devices are not very expensive, they aren’t exactly cheap either. And it is one more device that you have to carry with you and ensure that its battery is not dead. Many presentation venues are now equipped with a bright LED display instead of a projector. Your standard laser pointer is not going to stand a chance against the blinding lights of the display. No one is going to be able to see it the pointer. You could get a pointer with a brighter laser, but this can be dangerous. You must ensure that you don’t blind anybody in your lovely audience. And no matter how bright your laser is, it is only going to work for the audience that is in the same room as you. Since the laser is not captured in a screenshare, the people who are watching your talk in a livestream and/or recording would have no choice but to guess what you are pointing at.
There are some products where you get a software pointer, that is, they make a red dot appear on your computer that is also visible in screen recordings. But every such presentation remote that I have come across forces you to install their own (often laggy and proprietary) software for Windows devices, and offers no support for Linux computers at all (which is what I use).
In this post, we see how to implement a presentation remote with a laser pointer, without having to buy any hardware or installing any proprietary software on your devices. This procedure works perfectly with my setup: a laptop running Fedora Linux (specifically, GNOME with Wayland) and an Android phone. You should be able to adapt the instructions if you are running some other Linux distribution and desktop environment. I do not have a Windows or a macOS computer or an iPhone to test out which, if any of the steps below, break.
One-time setup
The following steps need to be performed only once to set things up between your phone and your laptop.
Installing KDE Connect
The key ingredient — the most crucial part of this setup — that will let you control your laptop remotely from your mobile phone is KDE Connect. KDE Connect is one of the most versatile and magical and useful application that I have ever used. You can use it to share files across devices, control your laptop’s media playback from your phone, use your phone as a keyboard and touchpad for your laptop, use your laptop’s keyboard and touchpad as an input method for your phone, and so much more. Today, we will use KDE Connect to use our phone as a remote presentation controller.
You can get KDE Connect for your Android device from either the Play Store or F-Droid. Install the app and grant the permissions that it asks for.
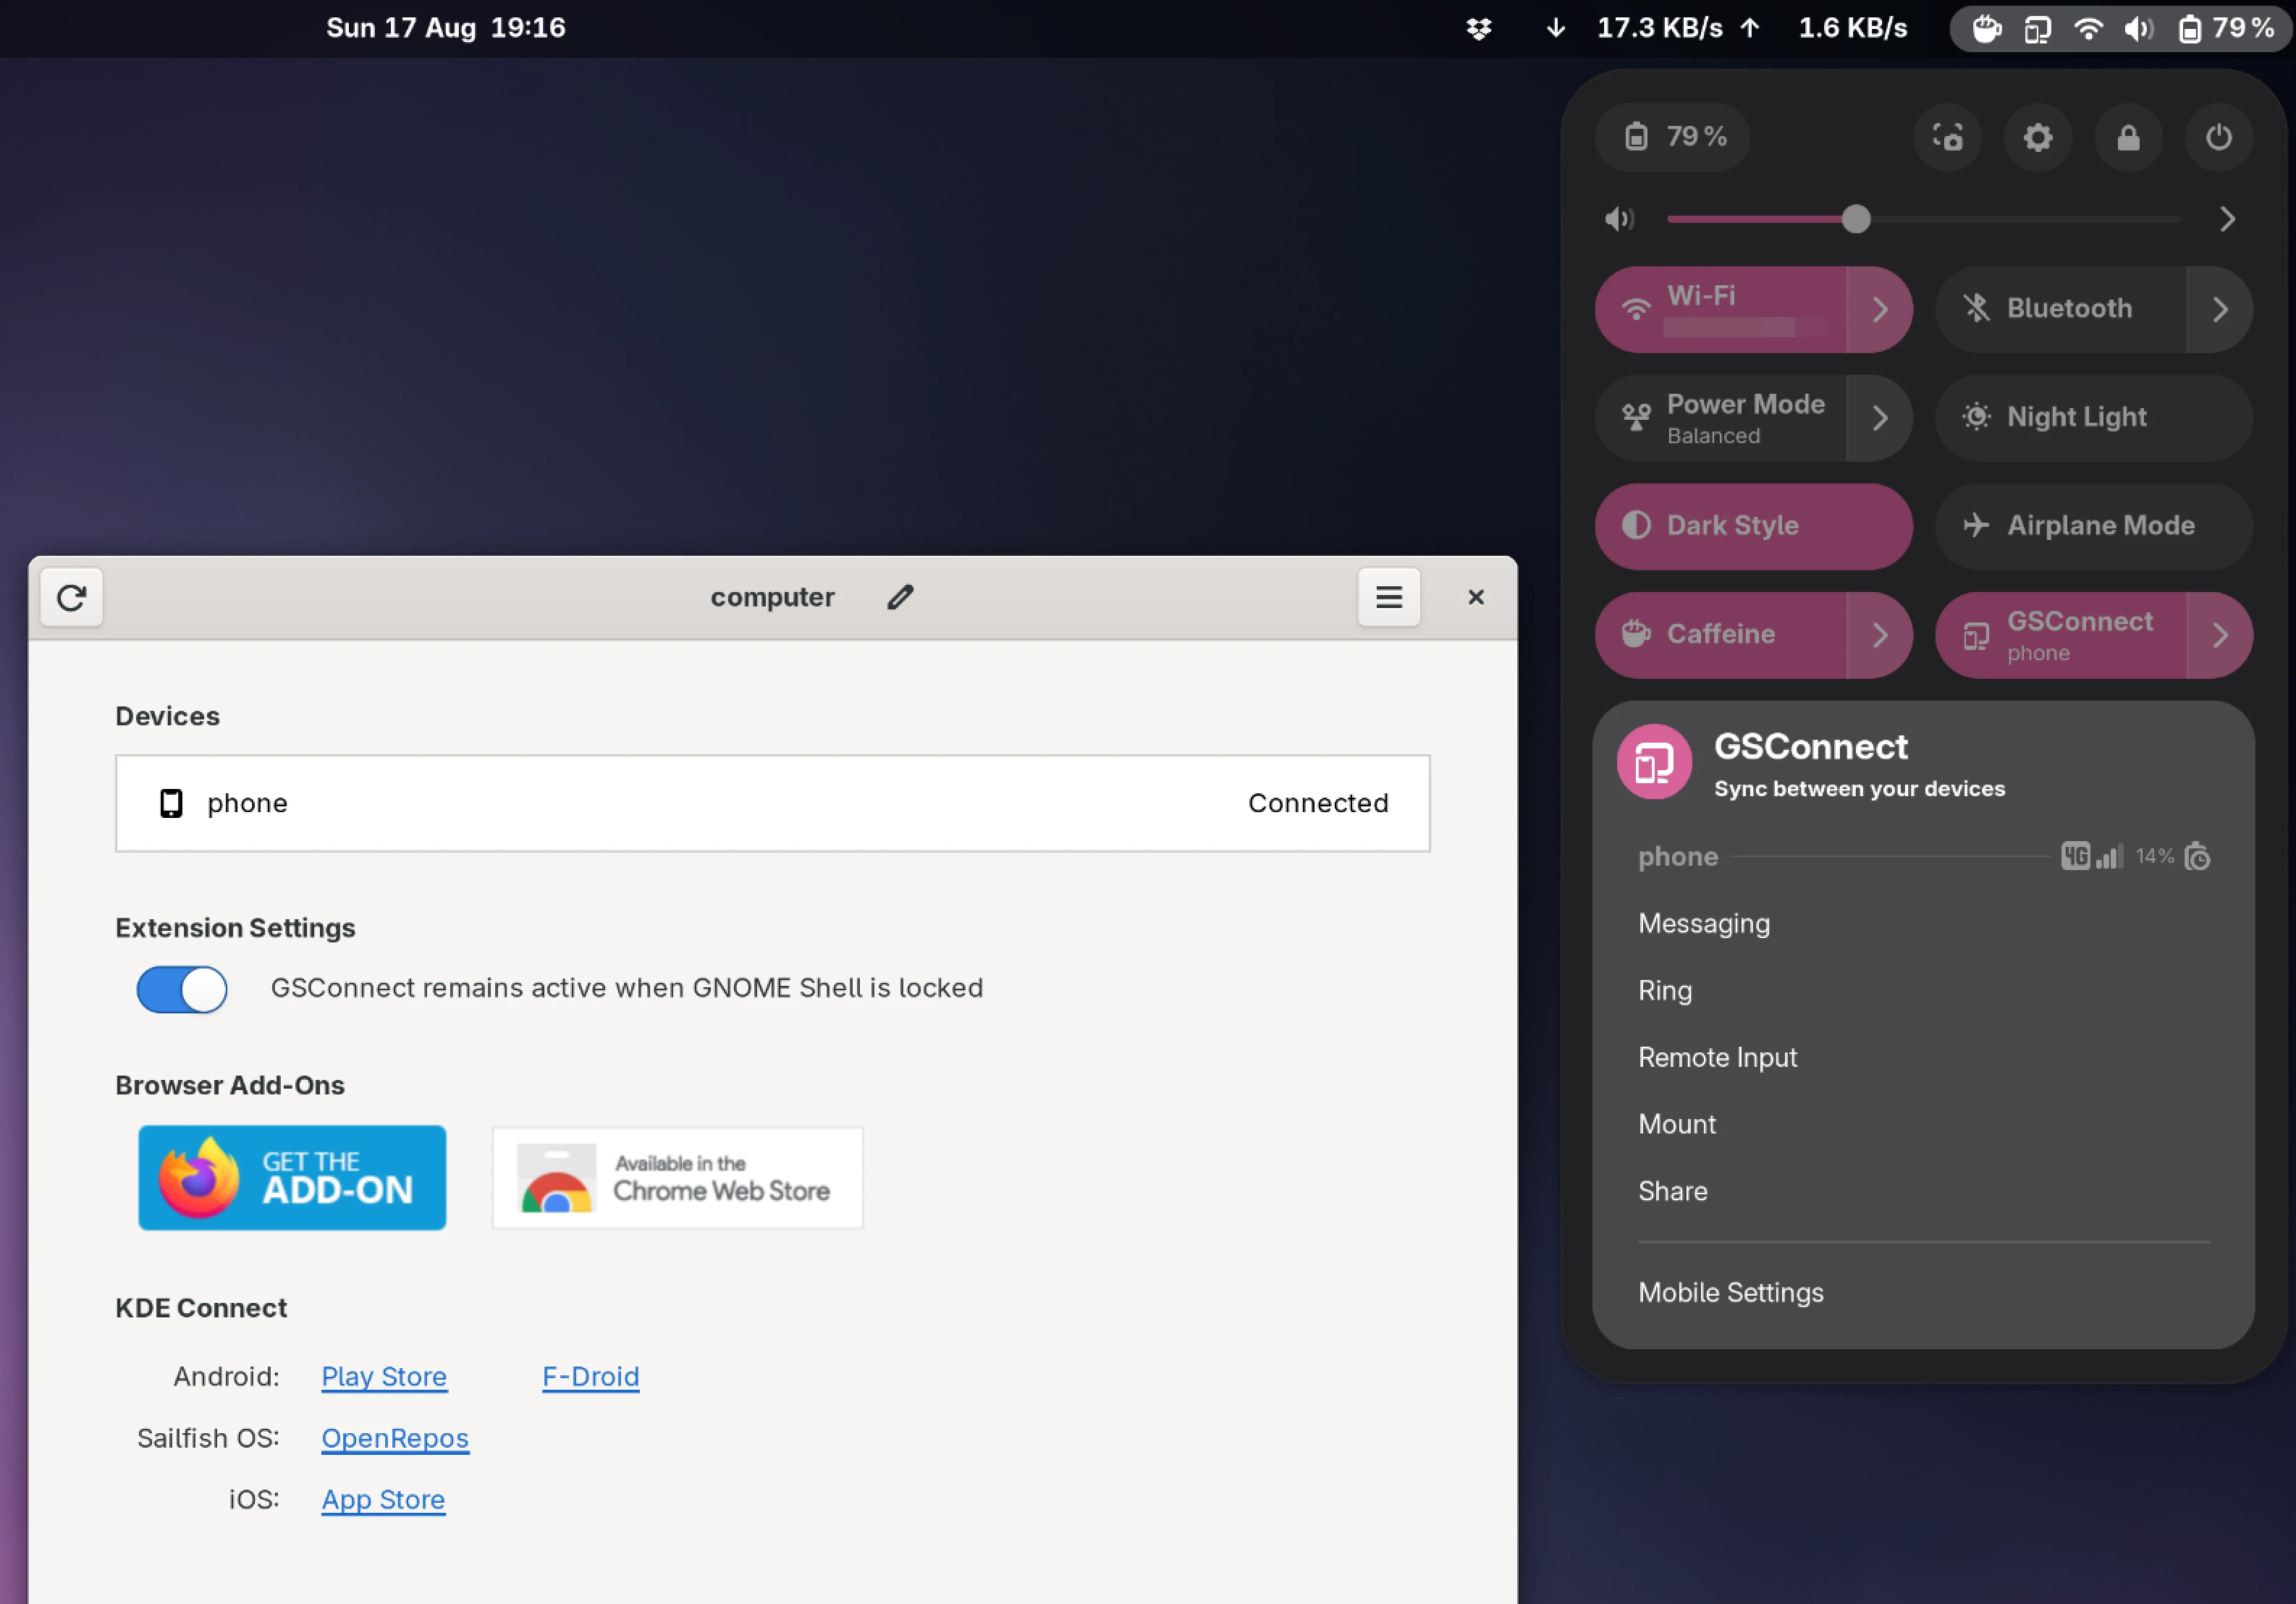
You would also need to install KDE Connect on your laptop. On GNOME, it suffices to install the GSConnect GNOME extension. Upon installation, you can check the status of the GSConnect application from the Quick Settings panel. For desktop environments other than GNOME, you would most likely need to install KDE Connect from your distribution’s package manager.
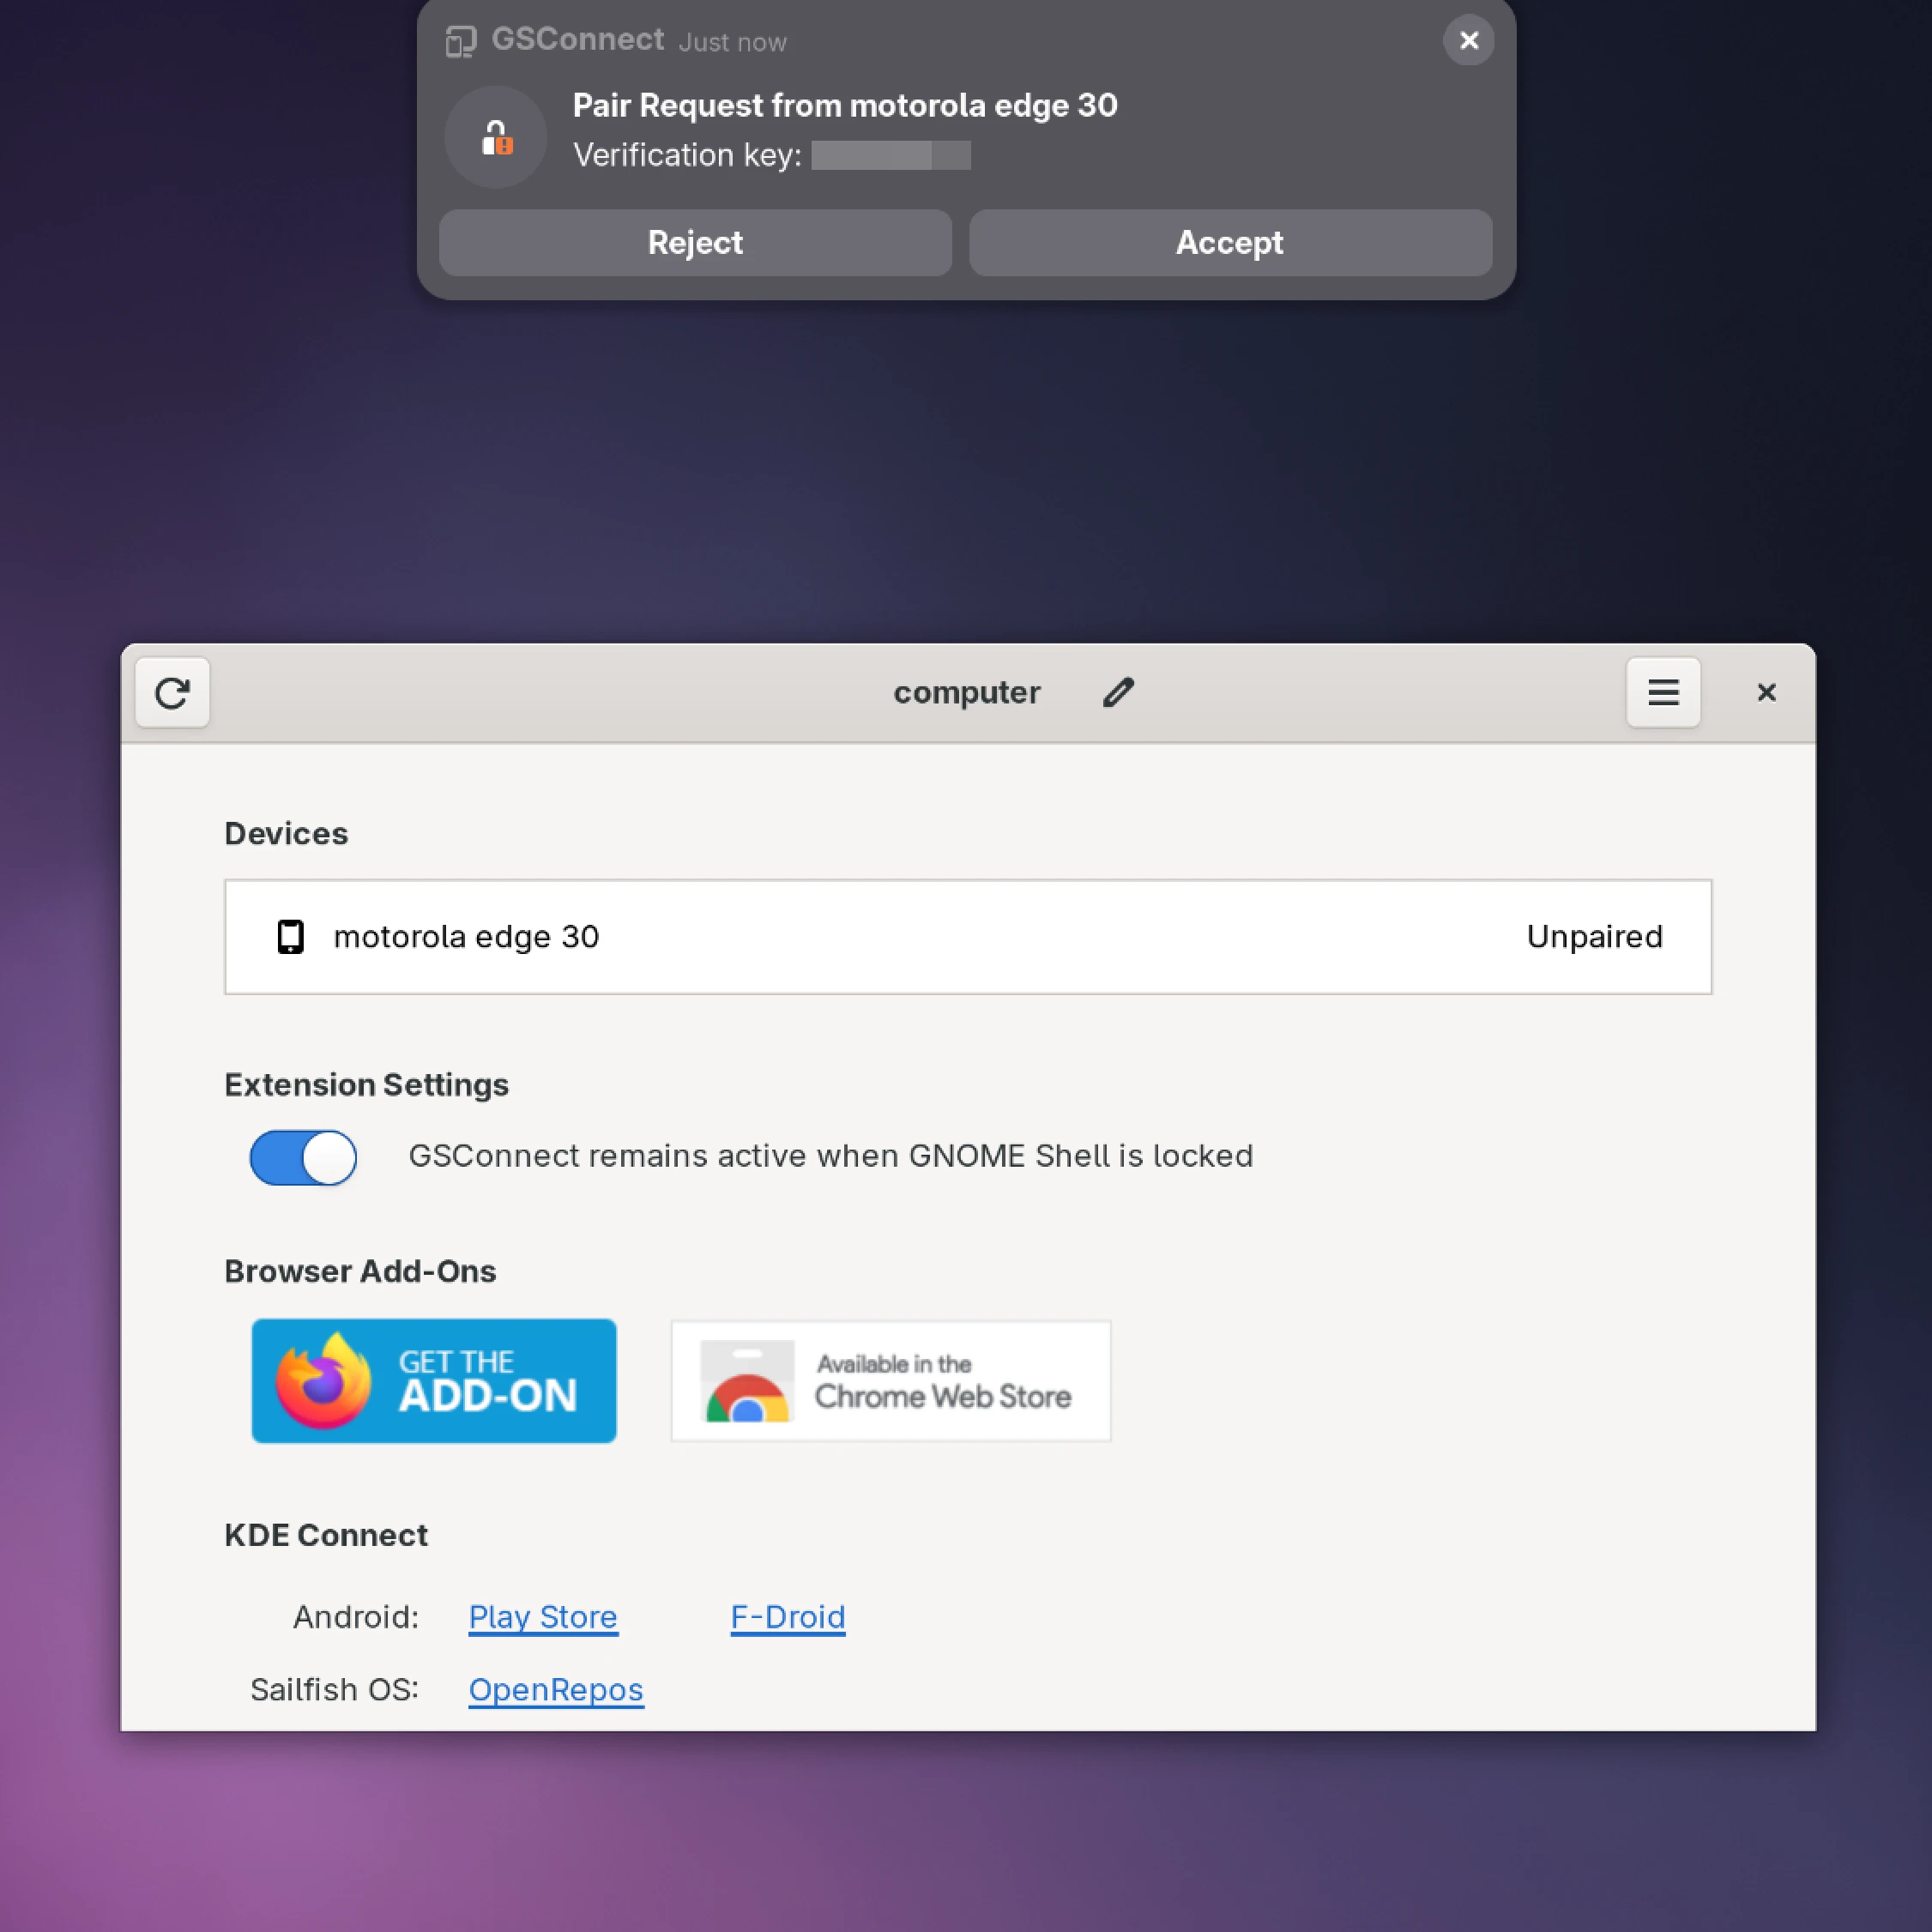
Pairing your devices
The next step is to pair your phone and your laptop. Both of your devices would need to be on the same Wi-Fi network. If you do not have a Wi-Fi network available, you can also connect your laptop to your phone’s hotspot and everything works just fine.
Both devices should be able to see each other now. They should both appear in the each other’s list of available devices. Click on “Pair” from one device and accept the connection from the other device.
If you expand the GSConnect quick setting tile and if the devices are paired and connected, you should be able to see the current battery and network status of the phone and also see some commands that you can send to the phone. You can send a ping from your phone to your laptop. If all went well, you should see a notification on your laptop.
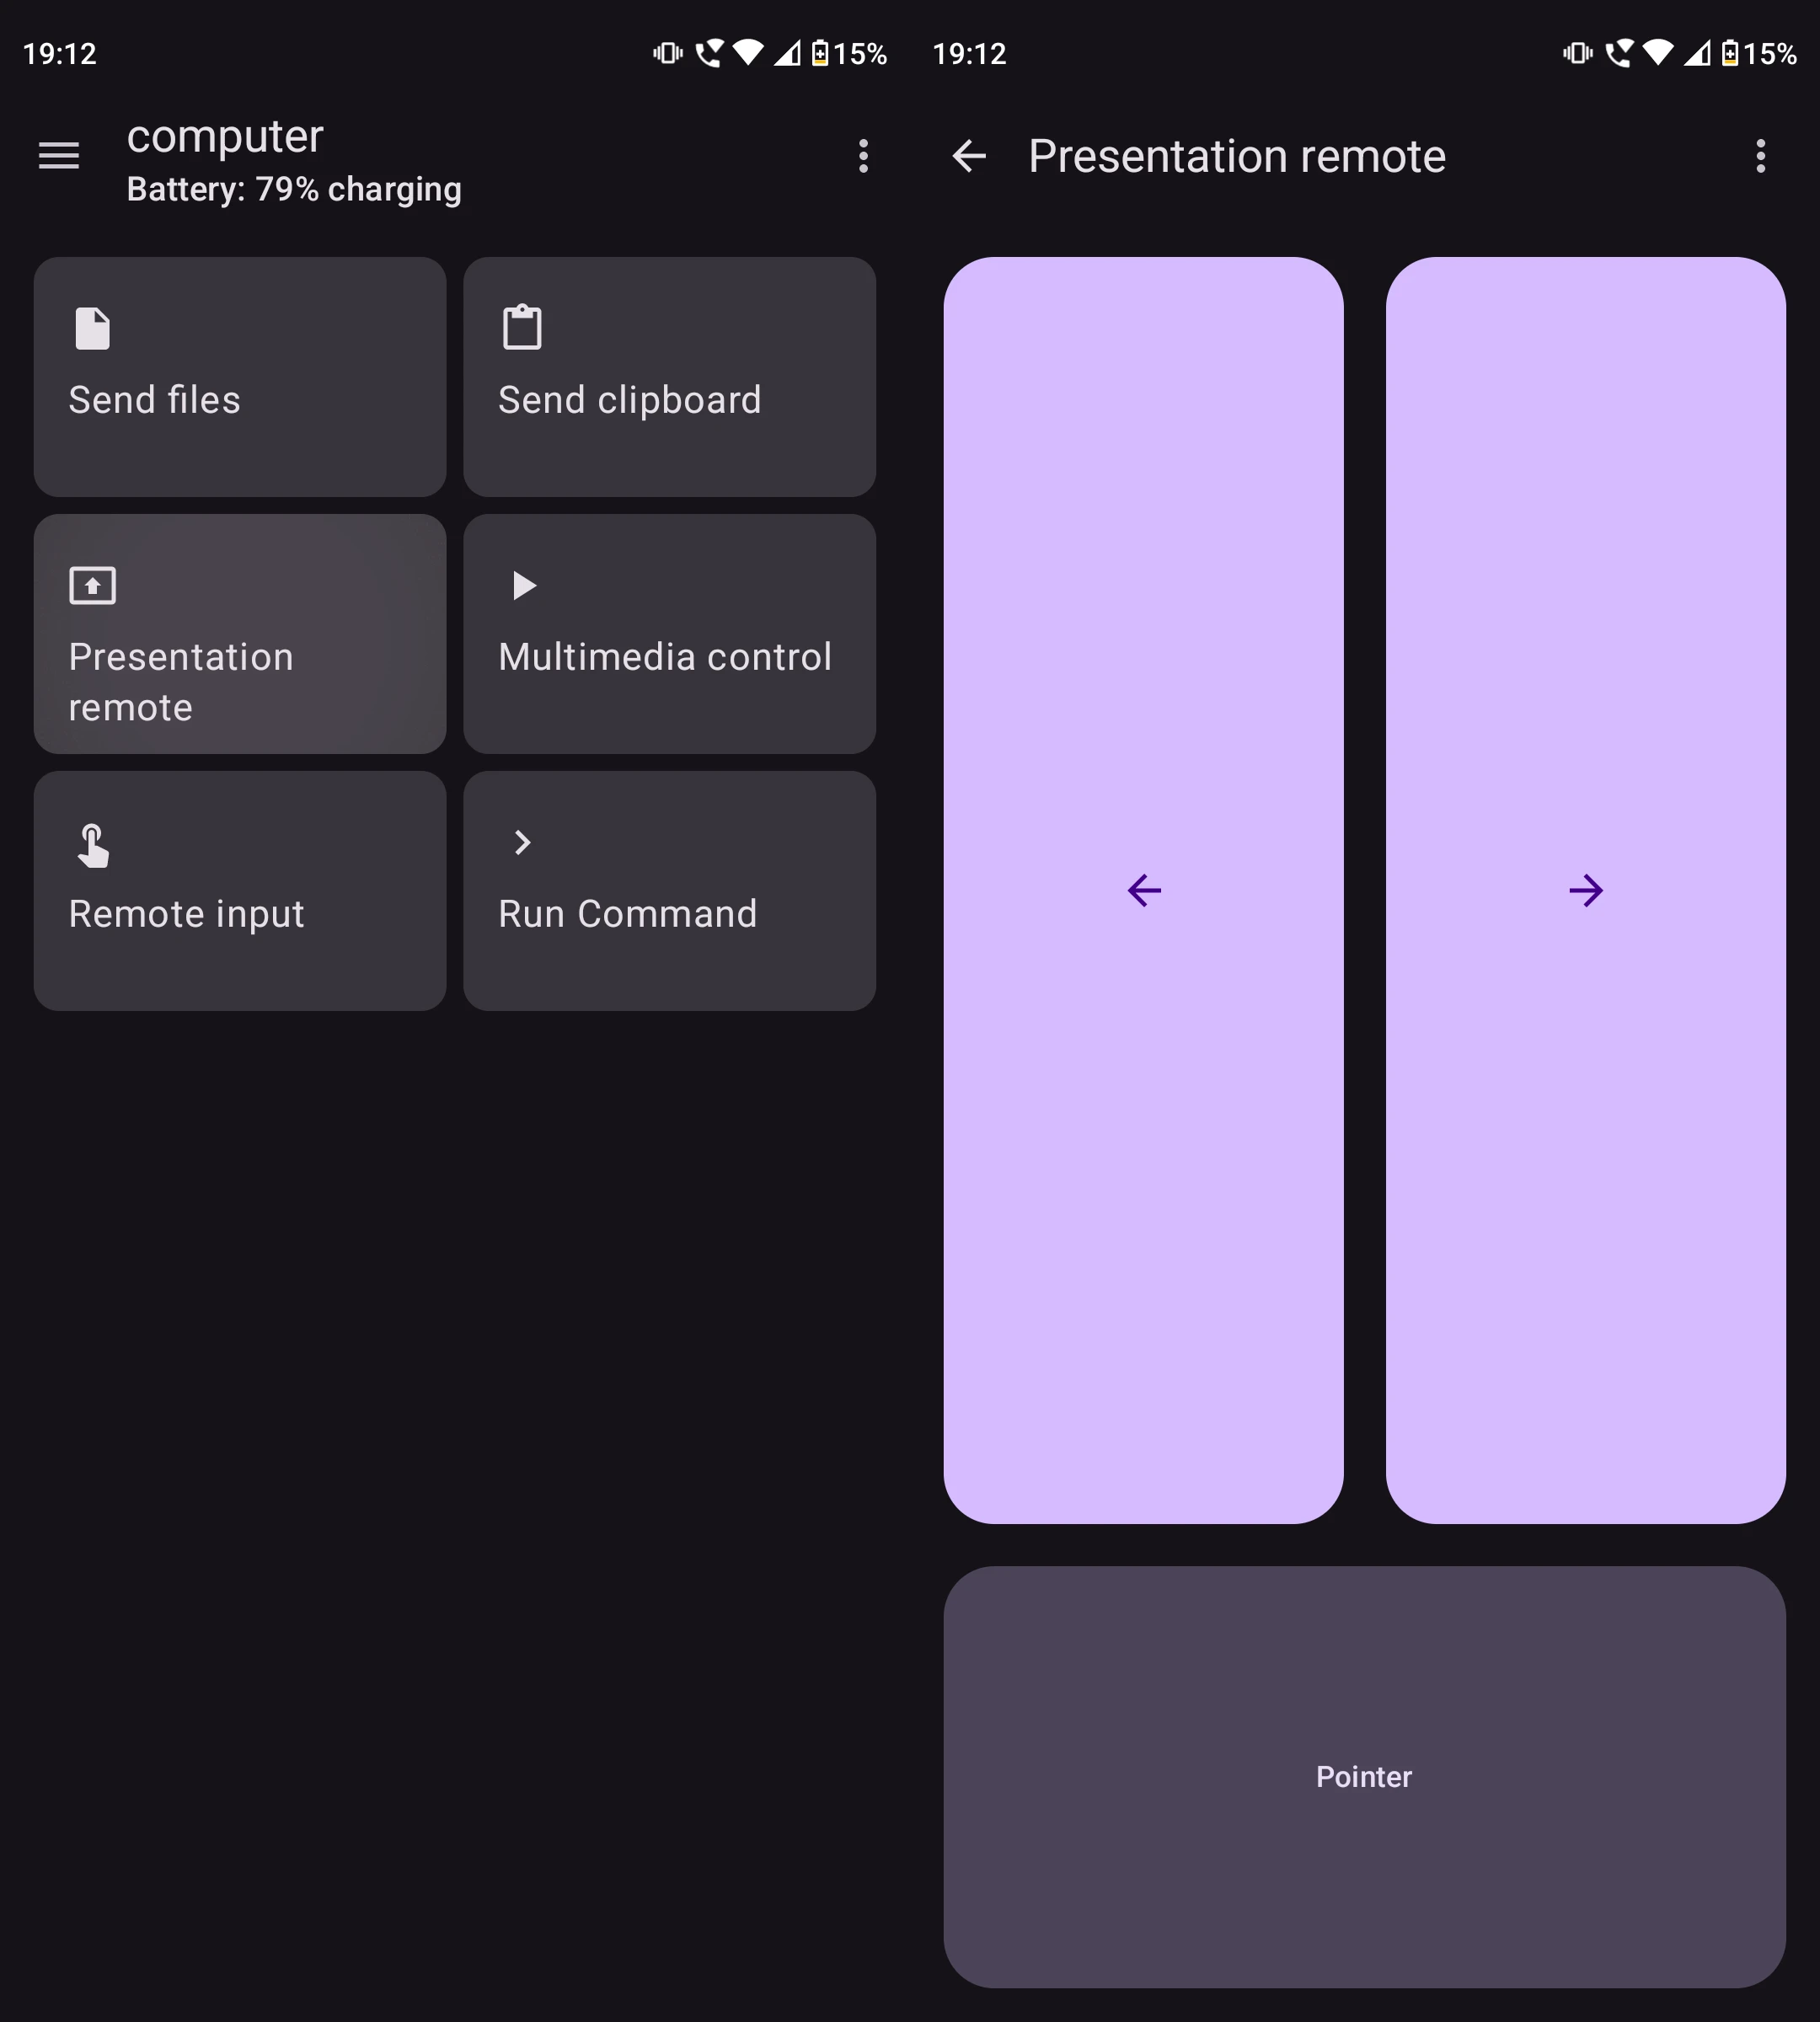
Click on “Presentation Remote” in the KDE Connect app on your phone and you will see buttons to change slides and to enable the pointer.
This is really a fancy restricted keyboard and mouse in disguise.
The forward and next buttons send the events Prior and Next respectively to your computer.
In the three-dots-menu, you have the commands “Full-screen” and “Exit presentation” which are aliases for F5 and Escape respectively.
If you hold down the pointer button and move your phone around, you should be able to see the cursor move around the screen.
Open a presentation file and try everything out. At this point, we are functionally done. Everything works, but we would like to make this more beautiful.
Changing the cursor shape and size
Instead of the default mouse cursor, I would like to show bright red laser dot during presentations. This can be easily achieved by changing your cursor theme to a red dot. The GoogleDot cursor looks great and you can download it from its GitHub page. You can find red, blue, black, and white dot cursors.
Download GoogleDot-Red.tar.gz and extract it in ~/.local/share/icons.
You can create this directory if it doesn’t exist.
You can now select the new cursor theme from GNOME Tweaks, or by running the following command.
gsettings set org.gnome.desktop.interface cursor-theme 'GoogleDot-Red'
If the cursor appears slightly small for your liking, you can go to Settings -> Accessibility -> Seeing -> Cursor size and choose a size that you like.
Alternatively, you can also change the cursor size from the command line.
gsettings set org.gnome.desktop.interface cursor-size 36
Customizing the cursor hide timeout
All of my presentations are PDF files, and I use the Papers application to show my presentation. When in presentation mode in Papers, by default, the cursor remains visible for about 5 seconds. I like the cursor to hide after a shorter duration.
I could not find a configuration to change the timeout in Papers, but I did find a GNOME extension called Hide Cursor that hides the cursor after a period of inactivity. Unfortunately, as of writing, a timeout of 5 seconds is hardcoded in this extension. Fortunately, the source of the extension is very simple and you can change the value of the timeout in the file.
By default, the extension is installed at ~/.local/share/gnome-shell/extensions/hide-cursor@elcste.com.
In this directory, in the extension.js file, edit the 5 to your preferred timeout.
I have set it to 3 seconds.
Now when you enable this extension, your cursor should disappear after the timeout that you have set.
(Note that if this extension is updated in the future, your changes will be overwritten and this file will revert back to its default state as written by the extension developer. You would have to change the timeout again.)
During the presentation
The setup is now done. Now, when it is time for your presentation, you only have to follow these easy steps.
- Connect the laptop to your phone’s hotspot and check if the devices can see each other.
- Change the cursor theme from GNOME Tweaks.
- Change the cursor size from Accessibility in GNOME settings.
- Enable the “Hide Cursor” extension.
You can now open your PDF in Papers or your slideshow in LibreOffice Impress, go fullscreen by pressing the F5 key, and you are now ready to present with your laser pointer phone!
After your presention is done, undo the above changes to get back to your normal mouse cursor appearance.
Using the terminal
I find it easier to execute the above steps in one go by running the following commands.
gsettings set org.gnome.desktop.interface cursor-theme 'GoogleDot-Red'
gsettings set org.gnome.desktop.interface cursor-size 32
gnome-extensions enable hide-cursor@elcste.com
To undo the changes, I run the following script.
gsettings set org.gnome.desktop.interface cursor-theme 'Adwaita'
gsettings set org.gnome.desktop.interface cursor-size 24
gnome-extensions disable hide-cursor@elcste.com
Pros and cons of this remote clicker implemenation
Pros
- You do not need to buy an additional device or install any proprietary software.
- The pointer is visible in screen shares and video recordings and there is no risk of blinding the audience with a laser.
- Works beautifully and people are impressed by this setup.
- Very easy to set up.
Cons
- This method only works if you can use your own laptop for presentation. If you have to use the venue’s computer, plugging a USB presenter dongle is still the most convenient solution.
- I have encountered a bug where the pointer goes permanently in the pressed mode and the cursor keeps moving even if you have not pressed the pointer button. The only thing that fixes this is disconnecting and reconnecting the devices.
- Some people may not like that you are holding your phone in your hand with the screen turned on during your presentation. I wish that you could use your phone’s hardware buttons instead of having on-screen buttons.
Let me know if you found this article helpful and if you used this setup for your own presentation. If you have any suggestions to improve the process, share that with me too.